Rust GTK: Creating a Menu Bar Programmatically with gtk-rs
This guide is written for gtk-rs and GTK 4.6
To create a menu bar in GTK4 we need a MenuModel, from which the bar is created.
The MenuModel can be derived from a Menu object.
Menu objects can have sub menues and and MenuItems as children, buidling a tree structure which represents the entire menu of the application.
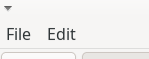
Let's start at the end of our menu definition, by defining the root of the menu tree. The root should only have sub menues as children.
let menu = Menu::new();
menu.insert_submenu(0, Some("File"), &file_menu);
menu.insert_submenu(1, Some("Edit"), &edit_menu);
let menu_model: MenuModel = menu.into();
This is our root menu and derived model.
The first parameter determines the ordering of the menu entries.
The second parameter defines the name displayed in the menu bar and the last parameter is a reference to another Menu object.
In this example menu has two children "File" and "Edit" which are further menus we have to define.
The resulting menu bar will look similar to this:
The menus are Menu objects.
To add selectable entries, MenuItems are inserted.
The first parameter defines the ordering within the menu.
I tend to leave gaps in my ordering to allow insertions later, without changing all order numbers.
The MenuItem takes two (optional) strings as parameters.
The first string is the string shown in the menu. and the latter references an action.
This action is executed if the menu item is selected.
let file_menu = Menu::new();
file_menu.insert_item(0, &MenuItem::new(Some("New Dungeon"), Some("file.new")));
file_menu.insert_item(5, &MenuItem::new(Some("Open ..."), Some("file.open")));
file_menu.insert_item(10, &MenuItem::new(Some("Save ..."), Some("file.save")));
The resulting menu looks similar to this:
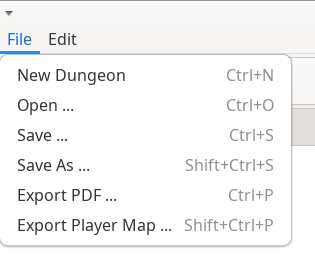
(Note that the shown shortcuts are automatically added when an accelarator is defined for the action).
To define the effect of selecting a menu item, actions have to be added to the window. I insert actions into action groups to organize them by their main menu. This code defines two actions in the "file" action group; "file.new" and "file.open". The name of the action group is defined when the group is added to the window.
let file_actions = SimpleActionGroup::new();

let action_file_new = ActionEntry::builder("new")
    .activate(
        move |_group: &SimpleActionGroup, _, _| {
            // Define behavior here
        },
    )
    .build();

let action_file_open = ActionEntry::builder("open")
    .activate(
        move |_group: &SimpleActionGroup, _, _| {
            // Define behavior here
        },
    )
    .build();

file_actions.add_action_entries([
    action_file_new,
    action_file_open,
]);

window.insert_action_group("file", Some(&file_actions));
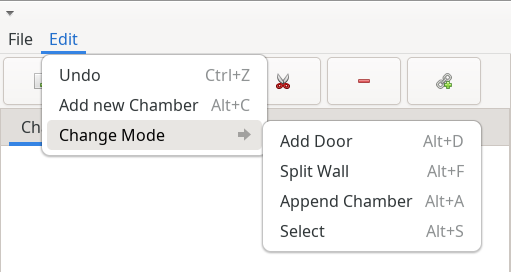
For further organization of menu entries, sub menues can be used. This uses the same method as used on the root menu.
edit_menu.insert_submenu(20, Some("Change Mode"), &mode_menu);
This results in a sub menu similar to this
After defining the menu and deriving the MenuModel a PopoverMenuBar can be created and added to the application window.
This can be achieved by wrapping the content of the window in another box and adding the menu bar to this box.
let menubar = PopoverMenuBar::from_model(Some(&menu_model));

let window_box = gtk::Box::builder()
    .orientation(gtk::Orientation::Vertical)
    .build();
window_box.append(&menubar);
window_box.append(&main_box);

// Create a window
let window = ApplicationWindow::builder()
    .application(app)
    .child(&window_box)
    ...
    .build():
The full code used in these examples can be found in the DungeonPlanner Source Code